

Dealing with US-specific kitchen issues like awkward appliance layouts, poor lighting placements, and cramped walkways can turn daily meal prep into an exhausting chore.
By making strategic adjustments to cabinetry depth, lighting placement, and fixture choices, you can restore function and safety to your home’s central hub. Here is how to resolve these common layout bottlenecks without undergoing a full, expensive renovation.
Quick Answer:
Key Solutions for US-Specific Kitchen Issues
Microwave Height: Lower over-the-range units to 18–24 inches above the cooktop to prevent hot spill hazards.
Fridge Clearance: Choose counter-depth models or rethink door swing clearance to keep primary walkways open.
Garbage Disposals: Clear jams using an Allen wrench at the base and avoid grinding fibrous food scraps.
Pantry Layouts: Replace bulky walk-in corner pantries with pull-out tall cabinets to gain usable floor space.
Waste Management: Retrofit lower cabinets with dual pull-out bins for seamless trash and recycling access.
Quick Reference: US Kitchen Standards
| Feature | Standard / Requirement | Purpose |
| Task Light Color | 3000K – 4000K | Balances crisp food-prep clarity with a welcoming home aesthetic |
| Microwave Power | Dedicated 15–20 Amp circuit (built-in) | Prevents tripped breakers and electrical overheating |
| Wet Zone Safety | GFCI protection within 6 feet of sinks | Instantly cuts power if moisture contacts the electrical circuit |
Is Your Over-the-Range Microwave Mounted Too High?
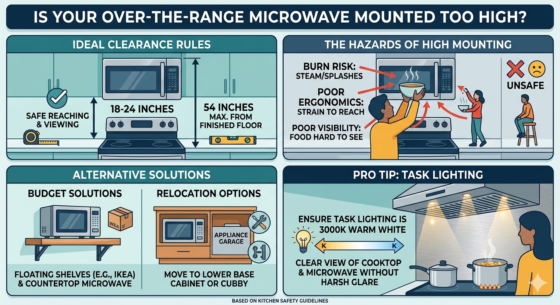
Imagine trying to lift a bowl of boiling soup out of a microwave that sits above your eye level. For millions of homeowners, this daily hazard is a reality caused by builder-grade installations that place over-the-range microwaves far too high above the cooktop. Not only does this create an immediate splash and burn risk, but it also makes reachability almost impossible for younger family members or shorter cooks.
Here is the thing: standard kitchen safety guidelines state that the bottom of the microwave should sit no more than 54 inches from the finished floor, leaving roughly 18 to 24 inches of clearance above the stovetop. When builders mount these units higher to accommodate larger decorative range hoods, they unintentionally create an ergonomic nightmare.
To solve this without tearing out your upper cabinets, consider relocating the microwave to an under-counter cubby, a dedicated appliance garage, or a lower base cabinet shelf. If you prefer to keep it above the stove, you can replace the bulky unit with a low-profile microwave hood combination. Brands like Whirlpool offer slim profile units that free up precious vertical headroom while keeping your extraction fan intact. Alternatively, if you are redecorating on a budget, floating shelves from IKEA or Dunelm placed alongside a lower countertop microwave can create a balanced, bistro-style coffee corner for under $150 (£120).
[INTERNAL LINK: Optimizing Kitchen Lighting & Electrical Issues and their Solution — Interior Design Tips]
PRO TIP: If you keep your microwave above the range, ensure your cooktop Task Lighting is rated at 3000K (warm white) so you can clearly see what you are reaching for without harsh glare.
Are Monster-Sized Refrigerators Blocking Your Kitchen Walkways?
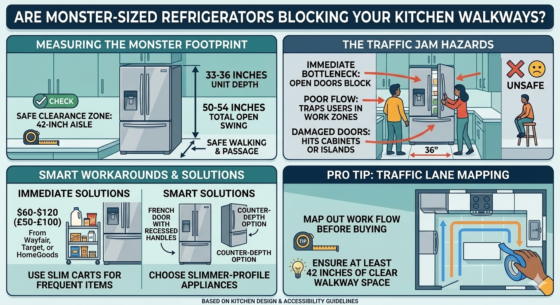
Now here is where it gets interesting: French door refrigerators are hugely popular for their massive storage capacity, but their sheer footprint often paralyzes traffic flow in traditional kitchen layouts. When those wide, double doors swing open, they can completely block the main aisle between your island and your primary prep area, turning cooking into a game of obstacle clearance.
A standard French door unit can extend 33 to 36 inches deep before you even open the doors. Add another 15 to 18 inches of door swing, and you suddenly need over four feet of clear floor space just to grab a carton of milk. If your kitchen aisle is less than 42 inches wide, open doors create an immediate bottleneck.
If replacing the appliance isn’t in your immediate budget, try repositioning your prep zone so you aren’t working directly in the door’s swing path. When it is time to upgrade, look for models featuring double-hinged doors or French door setups with recessed handles. Wayfair, Target, and HomeGoods offer slim rolling carts ($60–$120 / £50–£100) that can sit adjacent to your fridge, holding everyday items so you don’t need to open the main doors as frequently.
PRO TIP: Map out your kitchen’s traffic lanes with painter’s tape on the floor before purchasing any major appliance to guarantee you maintain at least 42 inches of open walkway space.
How Do You Fix Loud, Jammed Garbage Disposals in the Sink Drain?
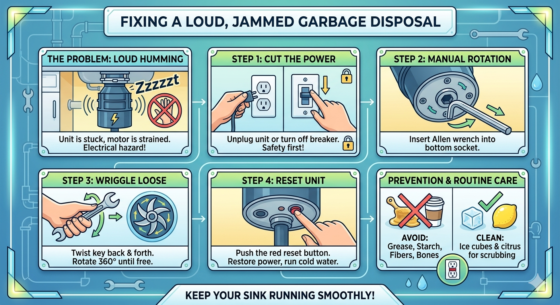
That horrific humming sound coming from your sink drain usually means one thing: your garbage disposal unit is jammed fast. In many American homes, the waste disposal unit is an essential workhorse, but continuous overload with fibrous vegetable peels, coffee grounds, or small bones can bring the entire sink plumbing system to a grinding halt.
And this is the part most people overlook: a jammed disposal isn’t just a plumbing headache; it is an electrical hazard that can trip your breaker or burn out the motor entirely. Before you call a professional, try clearing the blockage yourself using the basic safety steps below.
Cut the Power: Unplug the unit beneath the sink or turn off its breaker at the main panel.
Manual Rotation: Insert a standard 1/4-inch Allen key into the hex socket at the center of the unit’s bottom exterior.
Wriggle Loose: Twist the key back and forth until the blades turn freely 360 degrees.
Reset: Press the red reset button located on the bottom casing, restore power, and run cold water while testing.
To keep your sink running smoothly, avoid dumping grease or starch down the drain. For routine cleaning, grind a cup of ice cubes mixed with citrus peels to scrub the blades and freshen up unpleasant odors naturally.
PRO TIP: Install a dedicated under-sink GFCI outlet to protect your disposal circuit from potential moisture leaks and electrical surges.
Why Do Massive Corner Walk-In Pantries Waste So Much Floor Space?
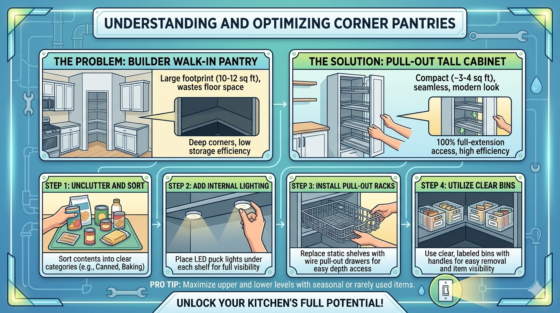
Walk-in corner pantries were a staple of early 2000s floor plans, promised as the ultimate food storage dream. In reality, these diagonal drywall structures consume a massive square footage footprint while offering shockingly inefficient storage depth. Deep, dark triangular shelves mean cans get lost in the far back corners, turning food management into a guessing game.
These giant pantries often break up the continuous line of your countertops, stealing valuable prep space and casting long shadows across adjacent work areas. Removing the drywall enclosure entirely frees up between 9 to 12 square feet of floor space—enough area to extend your counter runs or add a far more functional pull-out pantry tower.
| Pantry Style | Floor Space Used | Usable Storage Efficiency | Aesthetic Impact |
| Builder Walk-In Corner | Large (~10-12 sq ft) | Low (Deep, dark corners) | Bulky, breaks counter flow |
| Pull-Out Tall Cabinet | Compact (~3-4 sq ft) | High (100% full-extension access) | Seamless, modern look |
| Reach-In Shallow Pantry | Medium (~4-6 sq ft) | High (Single-layer shelf visibility) | Streamlined integration |
If a structural remodel isn’t on the cards yet, upgrade the interior lighting to eliminate dark spots. Mounting battery-operated LED motion puck lights from Amazon or John Lewis on every shelf level instantly brightens obscure corners. Replace flat wooden shelves with full-extension wire basket drawers so you can pull the contents straight out into the light.
PRO TIP: Use clear acrylic bins with labels on deep shelves so you can pull out an entire category of ingredients at once without losing items in the back.
What Is the Best Fix for a Lack of Trash-Recycling Cabinets?
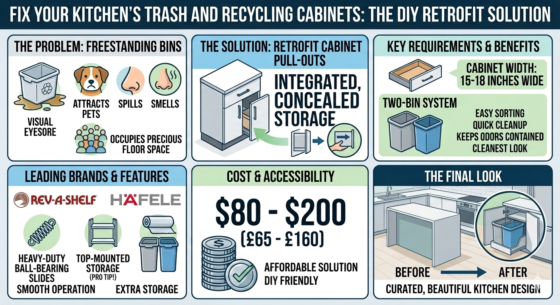
Nothing ruins the curated look of a beautifully designed kitchen faster than an ugly plastic trash bin sitting out at the end of an island or tucked beside the sink. Beyond being a visual eyesore, freestanding bins knock over easily, attract pets, and spill odorous smells directly into your main living and dining zones.
Integrating a dedicated pull-out cabinet for waste and recycling is one of the single best quality-of-life upgrades you can make to your home. It keeps clutter completely out of sight, frees up precious floor space, and simplifies sorting items during meal cleanup.
You don’t need expensive custom cabinetry to achieve this look. Retrofit kits from brands like Rev-A-Shelf or Hafele fit inside standard base cabinets (15 to 18 inches wide) and cost between $80 and $200 (£65 to £160). These systems feature heavy-duty ball-bearing slides that smoothly pull out two high-capacity bins side by side when you open the cabinet door.
PRO TIP: Choose a pull-out kit with a top-mounted shelf frame; this keeps an extra lid or trash bag roll stored right above the bins for quick access.
How to Handle Standard Depth Refrigerators Sticking Out Past Cabinets?
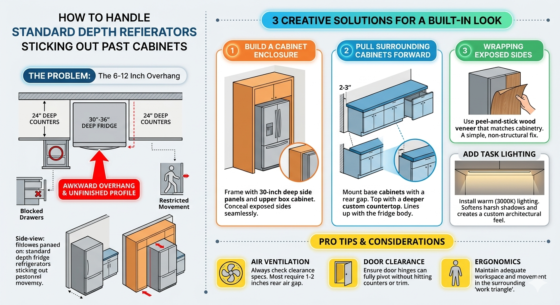
A standard depth refrigerator typically measures around 30 to 36 inches deep, whereas standard kitchen base cabinets only measure 24 inches deep. This means a standard fridge will stick out 6 to 12 inches past your countertop edge, creating an awkward, unfinished side profile that disrupts your kitchen lines.
This awkward overhang isn’t just an aesthetic issue—it can also pinch nearby drawer clearance and restrict movement in tight galleys. While purchasing a true counter-depth refrigerator is the ideal fix, those units often cost more while providing slightly less interior storage capacity.
Fortunately, you can create a built-in counter-depth look using creative design tricks:
Build a Cabinet Enclosure: Frame the fridge with 30-inch deep side panels and an upper box cabinet to conceal the exposed sides seamlessly.
Pull Surrounding Cabinets Forward: If remodeling, mount base cabinets 2 to 3 inches away from the back wall and top them with a deeper countertop.
Paint the Sides: If the exposed sides are a contrasting grey or black metal, wrap them in peel-and-stick wood veneer that matches your main cabinetry.
Adding high-quality task lighting around the fridge enclosure—such as warm under-cabinet strip lighting—helps soften harsh shadow lines and gives the entire zone a custom architectural feel.
PRO TIP: Always check the clearance specs for your fridge model; most require at least 1 to 2 inches of rear air gap space for proper ventilation and efficiency.
Frequently Asked Questions: US-Specific Kitchen Issues
Resolving frustrating kitchen issues in American homes comes down to making practical, code-compliant updates rather than undertaking a full gut renovation. Explore the answers below to address common electrical and lighting challenges:
Why do my kitchen lights flicker whenever I turn on the garbage disposal or microwave? Flickering lights usually indicate that your kitchen lighting and heavy appliances are sharing the same overloaded electrical circuit. To prevent power dips and potential tripping, appliances like microwaves and disposals should ideally sit on dedicated 20-amp circuits.
What is the ideal light temperature for kitchen task lighting? The ideal color temperature for kitchen prep zones is between 3000K and 4000K (warm white to cool white). This range offers crisp, clear visibility for cutting and reading recipes without making your kitchen feel harsh or sterile like an operating room.
Can I plug a microwave into a regular kitchen wall outlet? Most countertop microwaves can plug into a standard 120-volt GFCI-protected countertop outlet. However, built-in or over-the-range units generally require a dedicated 15- to 20-amp branch circuit to prevent overloading during heavy use.
How do I fix dark shadows under my upper kitchen cabinets? Installing slim, under-cabinet LED strip lights or puck lights directly solves under-cabinet shadow problems. Position the fixtures toward the front underside of the cabinet face—not the back wall—to cast light evenly across your entire countertop prep area.
Do I need GFCI outlets near my kitchen sink and water fixtures? Yes, building codes require all electrical outlets within 6 feet of a sink or water source to be GFCI-protected (Ground Fault Circuit Interrupter). GFCI outlets instantly cut power if water contacts the electrical line, preventing severe shocks and electrical fires.
